Wednesday, January 25, 2012

Road Work Ahead

Work continues at a breath-taking pace on my soldier table (call for a better name still in effect).  Recently I completed my roads and fences.

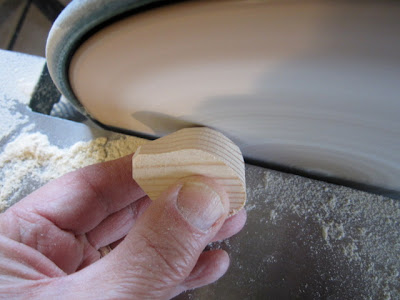
The road surface is a thin board of MDF cut on the band-saw with the wavy shoulder profile.  Separate shoulders (traced from the lower layer) were glued and clamped into place.  The edges were rounded off on the belt-sander

After painting and texturing the shoulders I spread a uniform coat of Liquid Nails on the roadbed.


Onto the still wet adhesive I liberally sprinkled fine sawdust.


Next step was to press wheel tracks into the surface...


followed by plenty of hoof-prints.


After the adhesive cured I brushed all the loose sawdust from the surface and applied a light wash of very thinned-out black acrylic paint.


When that had dried thoroughly I lightly dry brushed the road to highlight the detail.


Definitely not the road less travelled.

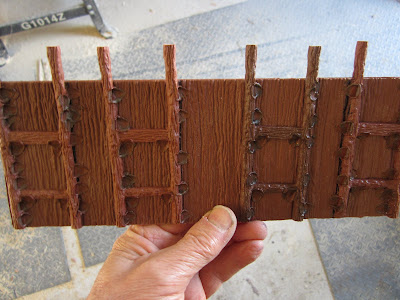
Next it was time to put up fences.  I patterned them after the five rail post-and-rail turnpike fences found at Antietam National Battlefield.

The posts were milled from pine and drilled to accommodate four rails.


Using scrap oak I made the rails, each about seven inches in length.  The ends were tapered with 
a razor blade.  As I was working with oak this was a breeze.  There was no splintering and the rails are very durable.


The taper must be thin enough to fit two ends into each hole on the post...


thus:


Now with road established and fences erected our artillery battery can gallop into action!


Never a dull (nor idle) moment around here.


Soldier on!

Mannie

Saturday, January 21, 2012

54mm Covered Bridge

 .

I've posted before about how versatile the BMC/Americana buildings are, seems you can make them into just about anything.  As part of my new soldier table (not the best name...I'm open to suggestions) I wanted to make a covered bridge so I can do a Monocacy battle sometime in the future.

I planted myself at the kitchen counter with a utility knife and a BMC/Americana Andersonville kit and a Lee's headquarters set, everything I'd need for all of the components.


Always use a sharp blade; safety first!


 Here are all of the parts except for the ramp surfaces. The brown pieces are from the gates and palisade walls of the Andersonville kit, the gray is the roof of Lee's headquarters.  For convenience I matched the bridge length to the length of the roof panels to avoid any need for splicing.


For the inside support beams I cut down the guard tower supports from the Andersonville kit.

All of this was easy and relatively quick.  Now comes the difficult and time consuming part - melting the pieces together, what I call "plastic welding"

Melting plastic makes a pretty nasty and toxic smoke so I use lots of positive ventilation.  All the welding is done in my painting booth.


A respirator takes care of the fumes which escape the vent fan.


The soldering iron with a chisel tip does the trick, but the bond is brittle so more welds is better than less.


All the support timbers are welded into place.


Things are shaping up!


The peak of the roof had to be welded, making a pretty unsightly bond line.  This wasn't a problem as I added a vent along the peak which was bonded with liquid nails and clamped with sheetmetal screws; removed after the adhesive cured (about a week).


A little sway in the roofline was achieved by cutting the peak edge of the roof panels with a slight curve.


A coat of black paint will accuentate the detail as the finish coat is applied.


Here's the white wash treatment, note it's a little brighter just under the eaves where it'd be a little more sheltered from the weather. 


And here come the little men!


With the work done and the paint dried, scouts arrive to check out the
brand-new bridge.


They made it through to the other side, looks like it works.


The finished product in the heat of the action, with many skirmishes
and battles ahead.


Soldier on!

Mannie


.

Wednesday, January 11, 2012

Come over to my house and play!

.


An idea has been churning around in my head for some time though its been far below the surface.  Suddenly I found myself aware of, and acting upon it; a larger surface, in the house, upon which to photograph, and play with, toy soldiers.   Time to head out to the shop.


I figured out the materials on paper and drew up a plan, then it was time to power-up the table saw and start cutting.


The table is designed to fit in an unused corner of the furnace room.  The available space is about four feet by seven and a half.


All that remains is to brace the legs, and to start building topographic elements - things for soldiers to hide behind!


Band-saw and sander (with extra coarse belt) teamed up to make some cool artillery lunettes.


Back to the sander to use the disc to transform odd pieces of 2"x4" into boulders.


Things are shaping up, with stone ridges, boulders, and terrain features.


For the most part this was all done using scrap wood that I just had lying around.  All of the hills are stepped, ziggurat-style, to allow soldiers to appear to be climbing them.

The pieces were cut and stacked for a large hill.  This was the only feature which had the layers permanently glued and clamped.


Hey, you use your clamps, I'll use mine.


Here's one version of how this strategic point can be utilized.


Now came painting and texturing.

For texture on most of the pieces I liberally brushed carpenters glue all over the surfaces and then sprinkled fine sawdust all over the wet glue.


This process is really easy and way cheaper than buying hobby-shop flocking.

Texture applied...


its time to paint.


Things are starting to take shape.


I cut a creek out of a sheet of Plexiglas and reverse-painted a creek on it.


Now came time to paint a backdrop.

I used the James Hope paintings at Antietam National Battlefield for guidance.


Using acrylics I got started.  Getting a nice gradation of blue for the sky was actually the hardest part.


The backdrop took about six hours to paint. Then I shoved the table back into position and started placing the various elements.

All pieces, save for the largest hill, have separate layers...


providing a variety of combinations.


With the paint barely dry and as the last element was put into place the troops started arriving on the field.


Artillery was well-represented and putting the lunettes to effective use.


A sentinel on the high ground surveys the arrival of the army.

In the valley below he sees the cloud of dust as cavalry thunder across the otherwise peaceful creek


Ancient boulders sit impassive to the machinations of man.


A signal station is established on a high prominence.


More artillery is rushed to the scene.  One can only imagine the outcome.

An outcome that may be the fodder of a later post.

Here it is, a nice, warm, dry place to play the winter away.  Total time to make this was two weekends and a few evenings in between.

This is a work in progress.  Right now I'm working on a road, lane, more terrain, and a railroad bed, and more trees as well.  I'll be posting more as things continue to evolve.  Do tune in.


The more things change...


the more they stay the same.


Soldier on!

Mannie


.