Sunday, August 23, 2020

Japanese artillery

Check this out.

I've been researching Japanese artillery for the project and I came across this cool Youtube on the subject.  It's great footage from the Japanese point of view that I've never seen before.  It answered some questions for me regarding Japanese camouflage schemes on their guns.


Here are some frames that I captured that will be helpful for my painting:


This one shows foliage attached to the gun tube, which was an unexpected find that I think that I may replicate.


Lots of fun in the offing...

Soldier on!

Mannie

Thursday, August 20, 2020

The Battle of Guam: bargains are out there!

An unexpected surprise.

On display, as part of  Guam's War in the Pacific National Park, is a Japanese type 96 twin-barrel anti aircraft gun.  I'm trying, as much as I'm able, to represent the various vehicles and materiel that was on the island during the battle.

The type 96 was out of reach, the Pit Road 1/35 version (the only one, I believe) comes in at $109.  Too rich for my blood.

Then I remembered a source that I used for one of my ship models...Shapeways.

Shapeways is a clearing house for dozens, or maybe hundreds, of people with 3-D printing skills and equipment.

Through Shapeways, I will eventually be buying a 1/35 Type 96 for $21.64.


Keep the 3-D printing option in mind for your own projects, and...


Soldier on!

Mannie

Monday, August 17, 2020

Battle of Guam: You are invited to share a story

Kindly watch this short video, and perhaps you can let me weave your family's Battle of Guam story into the upcoming battle narrative.

Soldier on!

Mannie


Tuesday, August 11, 2020

Battle of Guam, progress report video.


Don't be scared by this still frame of me.  This is an update on the project.  It's swallowing me alive, and I couldn't be happier about it.

Wear a mask, practice social distancing, stay healthy, and...


Soldier on!

Mannie

Sunday, August 9, 2020

The Battle of Guam: Japanese shore battery in 54 mm.


Guam is the home of the relatively new War in the Pacific National Park.  Back when I was a Park Ranger (I retired at the end of May) I used to think about how cool it would be to work there and to be on the island again.

When I was on the Island in 1971-'72 Japanese and American ordnance and materiel were still all over the place, generally, in their original wartime positions.  Now at the park, and some other privately-owned museums, the guns and tanks have been relocated - which is unfortunate, and is being maintained - which is good.

Before the Americans liberated the island the Japanese had heavily fortified it, with pillboxes, anti tank guns, anti aircraft guns, and shore batteries.  I wanted to find an inexpensive way to fabricate some shore battery guns like those pictured below.  It was a head-scratcher as to how I was going to make tapered barrels..and then, fate stepped in.

On eBay I found a dealer who was selling the gun assembly sprues for two Tamiya Japanese Chi-Ri tanks...cheap!  I jumped on that deal and watched my mailbox.


Turns out, the Model isn't Tamiya, it's Fine Molds. The modeling is very similar to Italeri  in that the parts were crisp, highly detailed and well-engineered, and like Italeri...sometimes the parts are way too small for easy assembly  Nonetheless, the gun subassemblies went together flawlessly. 


As this was originally a tank gun, some modifications had to be figured out.  I assembled it with the mantlet, as that is where the trunnions are - without the mantlet there would be no depression or elevation of the gun.  Frankly, I think I think the mantlet compliments, rather than detracts from the gun.  All along I was reminding myself that I wasn't making an exact replica of a particular gun, rather, a satisfying approximation of that gun, and I was definitely on the right track.Now I had to fabricate a pedestal and then figure out how to marry the two together.

I went to the scrap stack and cut down a piece of 2x2 into a one-foot length, clamped it in to the wood lathe, and started turning.  The wood was really bad, as dried-out pine can often be.  The grain was dry and open, but sanding was able to fix most of that.

As I had the sprue for two  guns, I turned both pedestals at the same time, to make sure that they would be as identical as possible.

When both were turned to my satisfaction, a quick trip to the small bandsaw cut them into two individual pieces. (I photographed them at the tablesaw simply because the light was better).
Now, I needed a ring-base for the pedestal.  This operation would take me to the drill press.

I found a hole-saw of the appropriate diameter and a nice scrap of craft plywood.I remind myself all the time how lucky I am to have a well-equipped woodshop,  As this blog has demonstrated over the years, the many, many things that I have fabricated for the toy soldier table, have all come out of this shop.
I found the centers, applied glue, and clamped. An hour later, the clamps came off and it was time for the next step.
Initially I thought it would be difficult to find a way to join the gun to the pedestal, fortunately, an elevation-wheel shaft went the whole width of the gun.  All I had to do was cut and drill a corresponding slot in the top of the pedestal, apply a dab of hot glue, and the two were joined together and ready to take to the spray-booth to prime.


I'm really happy with the result, and when I have the second one built, I will start fabrication the gun pits that they will be installed in.I hope you enjoyed watching the process as much as I enjoyed doing it.  I'm now convinced that my Battle of Guam project will be a journey, a personal journey into history and into my own experiences as a young sailor fifty years ago.I'm really enjoying this long process, I hope you'll stick with me to the end...whenever that is.Soldier on!Mannie

Thursday, July 30, 2020

The Battle of Guam: next in the queue


Sherman!


While I'm waiting for the rest of the paint to arrive for my LCM, I'm going to start building the tank that it will be landing on Red Beach.


Have I mentioned how much I'm loving retirement?


Soldier on!

Mannie

Monday, July 27, 2020

The Battle of Guam: process

These are all but six of the kits that are in the queue to be built for the Battle of Guam.  Again, I remind myself that the battle is well underway in the form of preparations...and I'm enjoying it immensely.


Soldier on!

Mannie

Monday, July 20, 2020

You never get too old for toy soldiers

lc99 left a comment a few posts back about how, now as a young man, he has dusted off his childhood toy soldiers and is playing with them again.  This prompted my thinking.


This is for my younger readers.

If you read this blog, then you probably enjoy playing with toy soldiers, just as I did when I was your age. 

As I got older...in my teens... I started to get very self-conscious, and even a little embarrassed by the fact that I was still playing with toy soldiers.  Of course, there was no reason to feel that way.

Sadly, at about age sixteen, I got rid of all my soldiers...hundreds of them, including my cherished Marx Blue and Gray and Desert Fox sets.

(recently, a friend just gave me his childhood Marx Desert Fox set, which was in storage at his parents home; you can only imagine how happy this made me.)


Now, many, many years later, how I regret that I no longer have them, how I would love to have my childhood sets of soldiers battling it out on the toy soldier table.

So here's some advice; and I think that it's good advice.  If you think that you are getting too old for toy soldiers, simply box them up and store them away...just put them in a closet and forget about them.

Then, one day when you are older, and start to have fond memories about playing with toy soldiers, you'll suddenly remember that you still have them stored away at your parents home.

How happy you will be to open that dusty shoe-box to be greeted by your old friends.

Please remember that you are never too old to play, and to play with toy soldiers.  And believe me, any fun and enthusiastic grown-up man or woman will tell you exactly the same thing.

Have fun, and...

Soldier on!

Mannie

(Back me up on this pals.)

Battle of Guam: reader poll

Hey everyone, I'm currently building the Trumpeter 1/35 US Navy LCM as one of the Battle of Guam components.  I'm taking step-by-step photos of the process.


Should I use these stills to make a video? or should I make a regular pictorial post with lots of pictures and commentary?


Leave responses in comments, and...


Soldier on!

Mannie


Sunday, July 19, 2020

The Battle of Guam: Battlefield ghost


This wrecked Sherman remains on the island since the battle.  Now part of War in the Pacific National Park, this tank was visited in the 1968 by my brother Carman, by me in 1971, and by my brother Joe in the late 1980s.  All three of us were US Navy communicators stationed on the island.  

There were two Shermans at this location along with some shot-up LVTs nearby.  We tried to conjecture what sort of battle had been fought there, only to find out later that this had become a firing range for the US military, and hulks left from the battle were hauled here and used as targets.

The Battle is still very much in evidence on the island of Guam.

Soldier on!
Mannie


Sunday, July 5, 2020

The Battle of Guam: video progress report

Take a look gang; and see how many extra syllables I can pack in to the word "Italeri."


As always...

Soldier on!

Mannie

Saturday, June 27, 2020

The Battle of Guam: Archival footage of LVT (A) s

Here is some really incredible footage of LVTs heading for one of the invasion beaches of Guam.

The footage of the amtracs starts at 3:54.  This is really worth a look and it will inform how I will paint my LVTs.


Soldier on!

Manne

The Battle of Guam: making the jungle floor.

Bungle through the jungle


Here I am on Guam in 1971.  I spent nearly all of my off-duty hours hiking the island; this was, and still is, called "boonie stomping."  For an eighteen year-old kid from rural Michigan, this was a very exotic place, and I loved just about every minute of it.  Guam has beautiful, reef-protected, white-sand beaches,  grasslands, mountains (Pacific island-style, not Montana-style), and lots and lots of thick jungle.  The denizens of the jungle (when I was there) were small deer, wild boar, monitor lizards, birds, and LOTS of spiders and mosquitos.  The latter owned the jungle.  The first thing one does before launching off in to the jungle, is to find a good "spider stick"...the stick that you constantly waved in front of you to knock down spiderwebs that are across the trail; and the spiders are BIG.  

The others kings of the jungle are the mosquitos.  Near water and at the bottom of ravines were the worst places for mosquitoes...actually they were the best places for the mosquitos; they were the worst places for the booniestompers.  One time I swatted my bare forearm and killed eight mosquitos in that single blow.  Insect-repellant gets sweated off fairly quickly in the hot steamy jungle.

A hot and steamy jungle is something that you have to experience to really understand what it feels like.  It's so hot, and so humid, that you actually feel a pressure bearing down on you.  You are sweating by the pint while battling mosquitos, struggling through the razor-grass to get to higher ground and the ever-present breeze that you'll find up there, for some relief.

Thinking back, I'm amazed at how little water we carried, usually just one canteen for one or two guys.  We'd restrict our consumption to sips of warm water, where normally, today, I'd be guzzling it by the bottle.  I don't know how we did it...frankly, I don't know how we did any of it back then.

This jungle is something that I can only approximate on the toy soldier table, I would need a lot more vegetation than I have available, as well as a wider variety.  We may think of jungles in the Pacific as being mostly palm trees...not so.  The jungles on Guam are choked with mahogany trees, bamboo, tangan-tangan, groves of bamboo, ironwood, coconut palms, and lots and lots of other stuff.

For my version of the Guamanian jungle I have recast Marx palm trees and ferns, aquarium bamboo, and aquarium grass and ferns.

These aquarium products were a breakthrough for this project, it was a recommendation from a friend on a toy soldier forum.


Plastic aquarium grass is readily available and very inexpensive.


It  comes in 9"x9" squares and I bought two varieties...


ferns, and grass.


Each tuft is molded in two tones of green which makes them look  realistic.


Each tuft is fastened to the flexible plastic grid below by a small stud.


The grid will be a cinch to cut into irregular shapes.


By unfastening from one grid and fastening to the other, I was able to achieve a nice mixture of grass and ferns on a single grid.


The grid allows you to poke the Marx palm trees and ferns through the jungle floor - concealing their bases, for a very convincing look.


There are places on Guam that look just like this lightly-wooded area, I've hiked them.  For more intense jungle I will pack a lot of trees in the grid as well as the plastic bamboo.


Eventually, when this Marine is painted, he and his colleagues will be struggling through terrain that is very familiar to me...

Though fortunately, I didn't have people shooting at me.


Stay tuned, this will be a long hike together.


Soldier on!
Manne


Monday, June 15, 2020

The Battle of Guam: Gun Beach pillbox


Gun Beach.


Gun beach was a must-visit destination when I was a sailor stationed on Guam in 1971.  The snorkeling was great, but the location was remote and difficult to get to.  It involved a long hitch-hike from the Naval Communication Station at Finegayen.  

Hitch-hiking was the main form of transportation for servicemen on the island back then. We never knew how long we'd have to wait but we could always count on a ride eventually.  This was the main way that GIs got to meet Guamanians.  It was safe, fun, and reliable.  

Back to the narrative.  We got dropped off at a two-track trail that wound through the jungle. At that point the "boonie-stomping" began. We were huffing and puffing, sweating, battling spiders and mosquitos the whole way.  After a long, hot, and strenuous hike, we broke out of the jungle and found ourselves on the shoreline...but we weren't there yet, we still had a mile to go, navigating a shoreline that was as rocky as it was sandy.  As I recall, we rounded a bend and saw in the distance the distinctive bluff that towered over Gun Beach. 


 Finally we were there.  

A short breather was followed by getting into our trunks and gearing-up in our masks, fins, and snorkels.  The water was the perfect temperature and crystal clear...typical for Guam.  As we were inside the reef, sharks were never a problem.

While we were there I hiked around to find the gun for which the beach was named.  It was easy to find...a rusting short-barreled, large caliber gun in a crumbling concrete and coral pillbox. 


I swept away the spiderwebs and took a look inside.  The pillbox wasn't impressive only because it was so tumble-down and filled with debris; nonetheless, it was evident that, in its heyday, this was a formidable fortification with a menacing gun.

For my Battle of Guam project, I want to connect it to as many of my own experiences as I can from my days on the island.  To that end, I recreated a 1/32 version of the Gun Beach pillbox.


By the way, Gun Beach, like all of Guam, is considerably changed from my day:


The project began with the construction of the pillbox.  I used sheet styrene throughout.


The most time-consuming component was the stepped-embrasure.  I used the sheet styrene at right angles to all surfaces at the embrasure as well as the rear entrance to simulate very thick concrete walls.


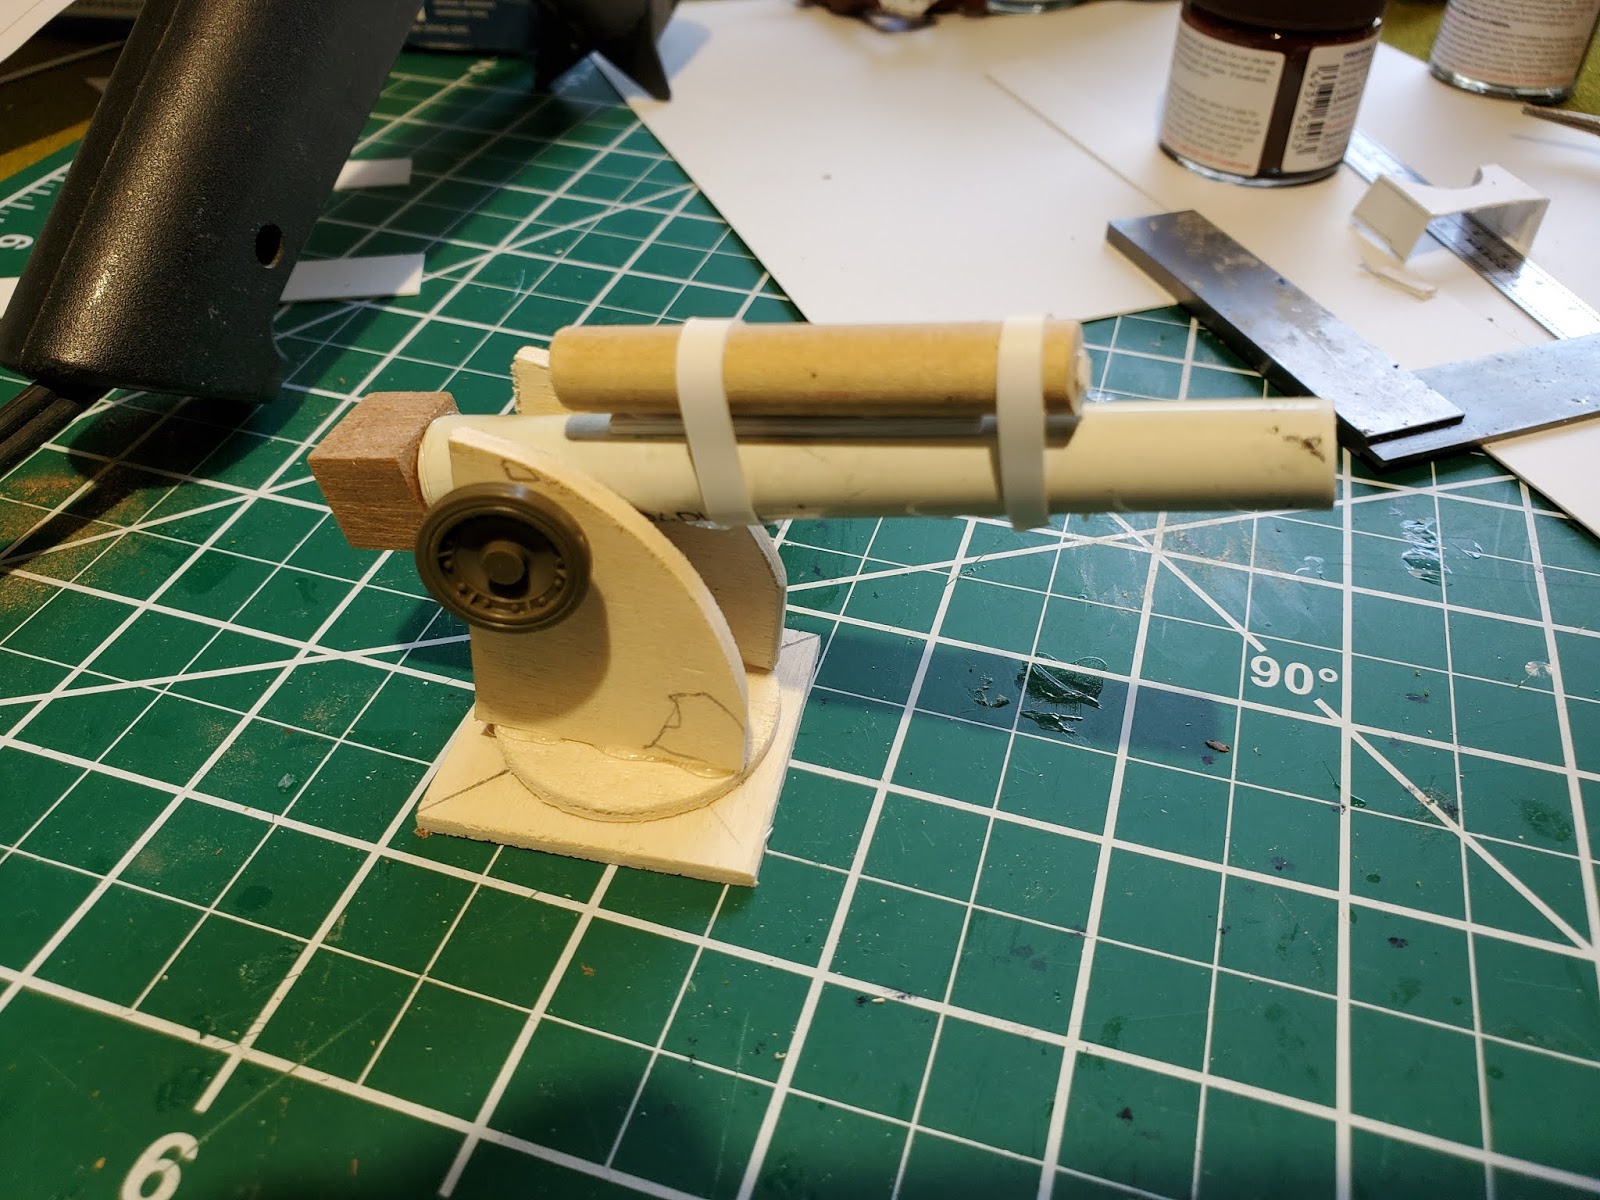
 I'm trying to do this project with materials that I have on hand...nowhere is this more evident than with the construction of the gun.


The gun barrel is part of a cast-off technical pen, and the recuperator is a piece of dowel.


The cheeks of the gun were laid out on a sheet of craft plywood and cut out with the scroll saw.


The next operation was at the drill press where I drilled out the holes for the trunnions.


Finding the center on the pedestal to drill a hole in which to mount the pintle.


I took a scrap of mahogany to the bandsaw to cut a square breech-block.  


The elevation wheel is a spare road wheel from one of the Tamiya Chi-ha tanks that I've made for this project.


The finished product.  I opted to apply a camouflage pattern to the portion of the barrel that protrudes from the embrasure.


I used hot glue to affix the gun to the floor of the pillbox, and with that, it was time to glue on the roof.


The rear entrance.  To provide a textured finish, I painted the pillbox in Tamiya gray primer overall, and then with some Testors black spray paint, I stood back about two feet from the spray booth and applied a very light spray.   I followed that with Tamiya haze gray in the same manner.  I'm pretty happy with the result.


Looking into the pillbox from the back entryway.


For the finished project, the pillbox will be bermed into the styrofoam terrain, concealing much of it.

I will probably be making two more pillboxes, one will be a copy of the Agana channel machine-gun position, and the other will be one of the very small ones on Tumon Bay that I used to change into my swimwear.

Preparations like this will be going on for a long time before the battle begins.

Watch this space and...


Soldier on!