Saturday, October 29, 2022

Battle of Guam: update, 10/22

 I know, I know...my Battle of Guam is taking longer than the entire Pacific campaign.


I've had a burst of energy of late, and on the smaller toy soldier table (out in the studio) I've been assembling a pretty good-sized section of jungle.


I spent a lot of time in the jungles, as well as the highlands of Guam, and although my recreated jungle won't be nearly as thick, tangled, and diverse as the real thing, it'll still make for a convincing scenariao.


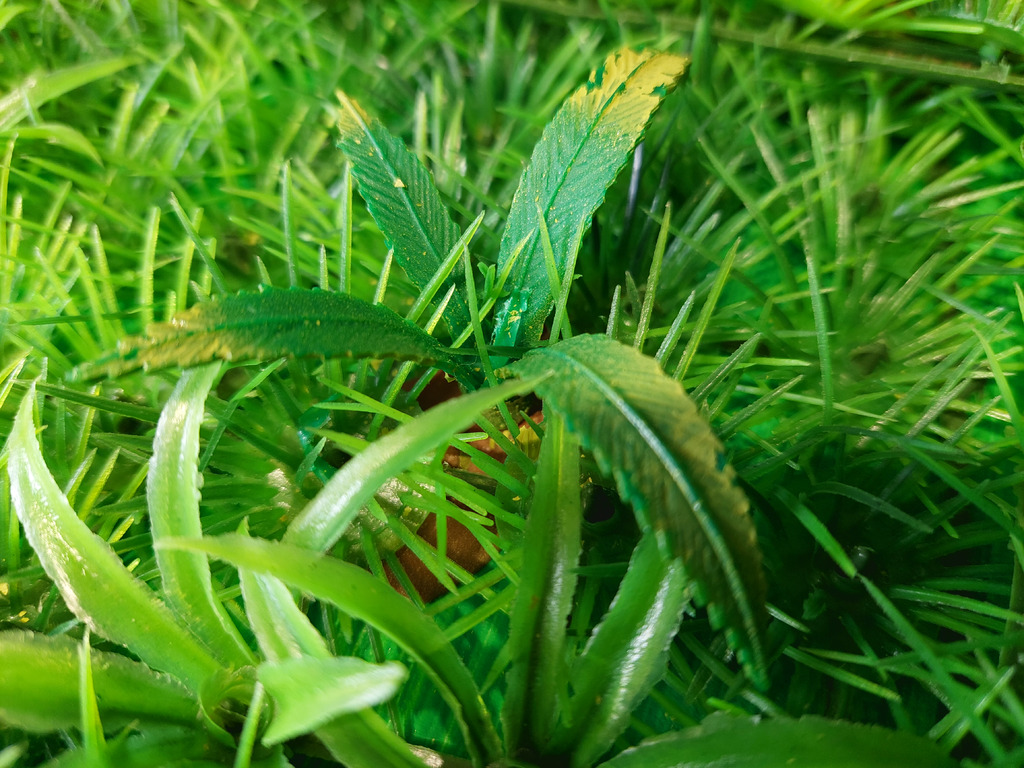
The jungle floor is comprised of 9" x 9" mats of plastic "aquarium grass" which is available, very inexpensively, from Amazon.


The mats come in two varieties, what I refer to as elephant grass (left), and ferns (right)


The individual plants plug in to the mat, so it's very easy to move them around to get a more realistic jungle floor.


I can almost hear the mosquitos.


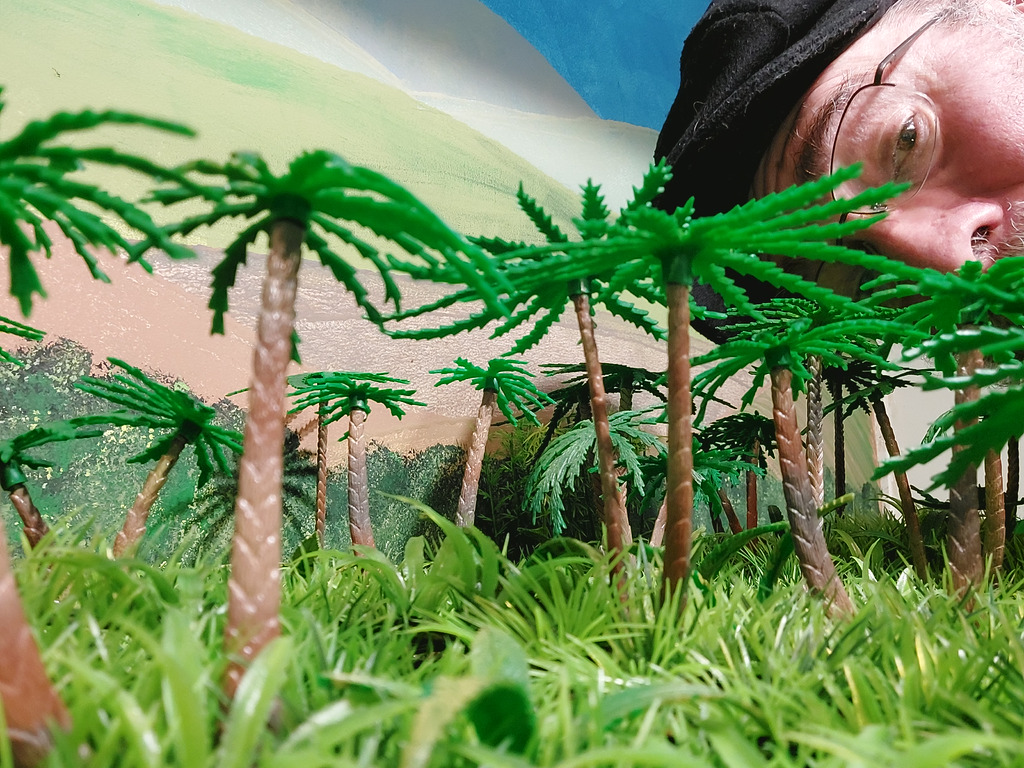
The mats are set up on a grid, which makes it very easy to...


pass my reissue Marx palm trees through,


as well as the Marx three, and four-frond ferns that I add throughout for a little more foliage diversity.


Also from Amazon, I was able to get bamboo;


Though not nearly as tall as that in the groves on Guam...


it still makes a convincing and pleasing effect.


All of the Marx components were given light oversprays of other colors - yellow, browns, gray, to give ferns, fronds, and tree trunks some dimension and variation.


I think that the result is quite convincing; and I am able to keep my Civil War backdrop as it is very similar to the mix of terrain that is found on the island.


After fifty years, it's good to be back on Guam, though it's much smaller than I remember it.

Enjoy the Autumn, and...

Soldier on!

Mannie


Tuesday, October 25, 2022

Let's chat sometime

 Hey gang,


If you ever want to talk toy soldier stuff, you can contact me at:


museumofamerica@myactv.net


Soldier on!

Mannie

Monday, October 10, 2022

Rebuilding the Marx Giant Blue and Gray seacoast mortar

 I've gone on at length about the Marx Giant Blue and Gray playset, and I'm sure that this won't be the last post on it.

In my junkbox I had a wrecked mortar chassis, and a couple of years ago I bought a Marx mortar that had the spring and ejector, but no trigger or rubber band. 

Over the past two days, I spent some time using the plastic from the chassis in the background, and the trigger from the mortar in the foreground, to fabricate a trigger for the mortar on the right.


From the working, seacoast mortar, I removed the trigger to use as a pattern.


I found a place on the chassis from which the new trigger could be made.


With my trusty razor-saw, I cut out the plastic panel.


Using the existing trigger as a pattern, I traced around it.


I took the blank to the drillpress to put that characteristic hole in the trigger.


With a Dremel tool I removed the bulk of the excess.


After much cutting, sanding, and fine-tuning, I had the new trigger (top).


I must have taken that mortar apart eighteen or twenty times, trying to get the trigger to fit just right and to fire smoothly.  It eventually became apparent that the new trigger wasn't quite thick enough, and it would unseat itself when depressed.


To solve this, I used a piece of thin styrene to make a splint.  Again, it took a great deal of fine-tuning and sanding to get it right.


Here is the repaired mortar, in the foreground, ready for a test firing.


And here is the result:


A very satisfying project has netted me another good shooter to take into battle.

See you next time, and...

Soldier on!

Mannie

Sunday, October 9, 2022

Happy Autumn

 Out in the toy soldier studio, the frost is on the pumpkin.


Have a happy Halloween, and...


Soldier on!

Mannie

Sunday, October 2, 2022

message in a bottle

 Scott L.


Shoot me an email at    museumofamerica@myactv.net


Soldier on!

Mannie

Saturday, September 10, 2022

Fort Apache part 3: small detail

This is just a quickie.

On the over-the-gate blockhouse something was bugging me. It was the weird horizontal compartment between the floor of the blockhouse and the top of the gates...you can just make it out in these photos  (downloaded from the web). It served no purpose and was a weird engineering/design decision.


To fill it in, I took a fort wall section over the the bandsaw and cut out some horizontal pieces that exactly fit the gap.

Glued into place, I can hardly tell that the gap was there.


I think that details like this are going to make the project take longer to complete, but will also make the project that much more fun.


Soldier on!

Mannie

Thursday, September 8, 2022

Fantasy Fort Apache: part 2 - barracks conversion.


MPC made this four-piece bunkhouse for a few years, and I think that you can still get recasts of it.  The box of Fort Apache odds  and ends that I got on ebay had three of these segments.  I used two for the structure and the third was cut up for raw materials.


The Fort Apache project has commandeered the woodshop, and I need to make significant progress if I want to get my Fall woodworking projects done.


On my smaller bandsaw, I started cutting-up the extra building segment.  The various pieces, shapes, and textures were used for the finished product.


From that new stockpile, I made two doors for the doorways at either end of the building.
(riddle: when is a door not a door?)


One of the odd things about this building is that the windows aren't square...the tops are wider than the bottoms.  I decided to correct this weirdness with some window-shutters.


Again, the shutters were harvested from the parts pile.


Glued into place, they cover the window frame discrepancies.


When it came time to join the two segments, I used Testors Model-Master glue and wood clamps.  Regardless of the material or the project, always clamp for the strongest bond.


Then it came time to deal with those ridiculous MPC chimneys.
The  chimneys are over-scale for the building, and the idea that there would be two free-standing fireplaces in the middle of the building was crazy; so I opted for a simple stovepipe.

The existing chimneys I turned into ventilator cupolas.


I salvaged the gables from the excess roof section to make the shingled covers for the cupolas.


Next I glued and clamped the two roof sections together.


The manner in which the MPC roof was joined to the building required a tab-and-slot system...leaving me with these unwanted slots in the roof.


Using water-putty, I filled and sanded the openings successfully.


With additional surplus shingle pieces I made awnings for the doors at either end of the building.


Ready for priming.


I use Tamiya primer for most projects, styrene plastic and pewter.  I've always had very good luck with it.


Coming down the home stretch.

Now comes the stovepipe.


Moving to the drill press, I made a hole the size of the pipe.

The stovepipe was salvaged from an old AMT Mercury Redstone rocket.


It was pretty straight forward.  The moral of the story:  Never throw anything away.


Glued in place and clamped with masking tape.


Once I fix those little discontinuities at the bottom, it'll be ready for painting.

Next up: the free-standing block house.

Stay tuned, and, as always...

Soldier on!

Mannie